Build a team knowledge base
Create a Context, load it with real material, teach the AI how to read it, then share it so colleagues can query it without owning the files.
By the end of this you have one Context that holds your team's reference material, reads it the way your team reads it, answers questions with citations you can click, and opens for colleagues on a link — with or without letting them see the underlying files.
Budget about 30 minutes, most of which is waiting for documents to finish indexing.
What you need first
- A signed-in account. Free accounts can own 3 contexts with 10 documents each; Starter 20 × 100, Pro 100 × 1,000, Max 500 × 5,000.
- The material itself, as files or text you can paste. There is no generic "add a URL" button — a web page only becomes a document through a live source (step 2c), which needs Pro or Max.
Step 1 — Create the context
- Click Context in the left sidebar.
- Click New.
- In the Create Context dialog, type a Name. The dialog previews the handle you will get,
as
@your-name. - Fill in Description (optional) — it is what other people, and the model, read to work out what this context is for.
- Pick an Icon and a Color.
- Click Create.
A cover image, tagline, category and tags are generated in the background. You do not have to wait
for them. If the handle is taken, Springbase appends -2, -3 and so on.
Heads up:
meeting,meetings,contextandcontextsare reserved handles and never resolve to a context. Typing@contextsin a chat means "search all of my contexts".
Step 2 — Get real material in
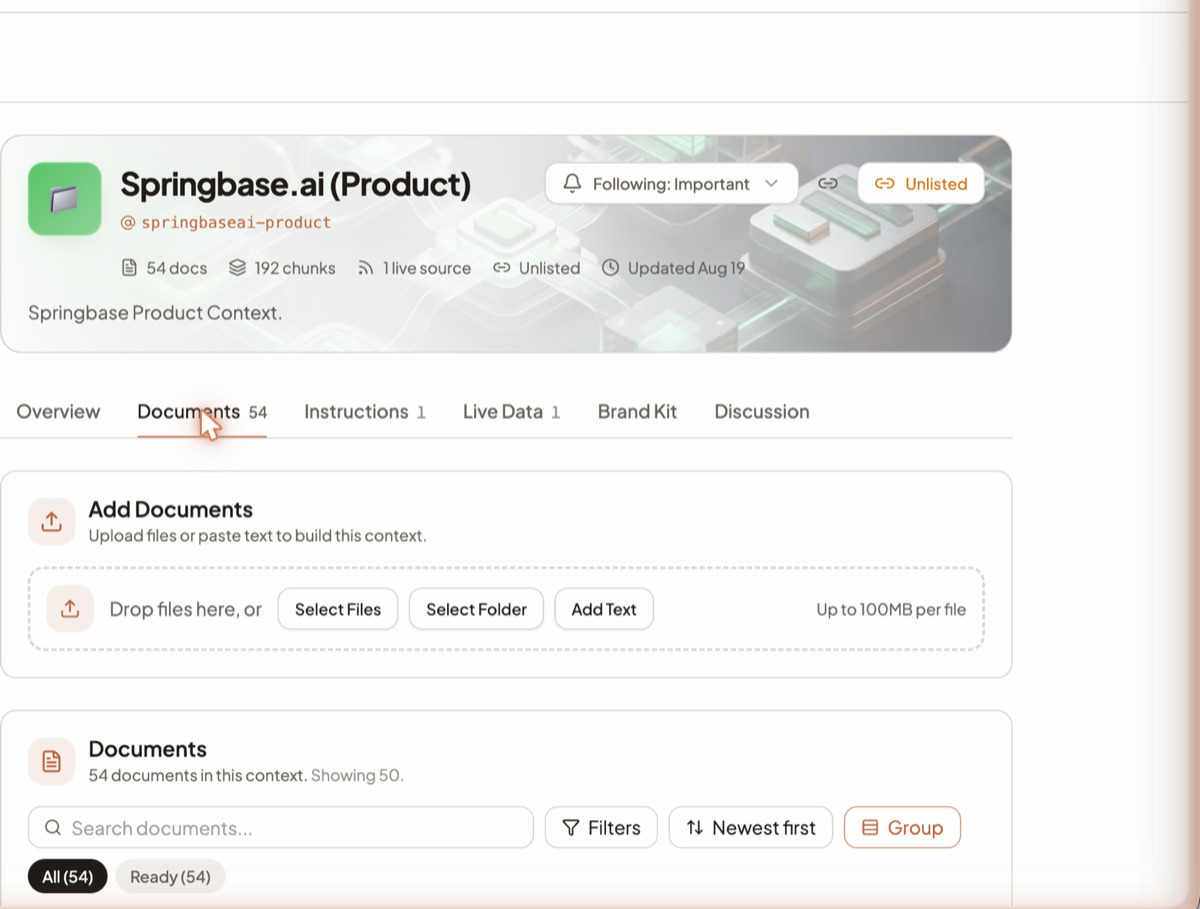
Open the context and go to the Documents tab. The Add Documents panel at the top says what it is for — "Upload files or paste text to build this context."
2a. Upload files
Drop files onto the area marked "Drop files here, or", or use Select Files; Select Folder walks a whole folder recursively, up to 1,000 files.
Accepted: PDF, Word, Excel, PowerPoint, CSV, text files and images (PNG, JPEG, WebP, GIF). Anything
else is refused with "We can't read .x files yet…". Three size limits stack and the smallest wins —
your plan's per-file ceiling (50 MB on Pro and below, 100 MB on Max), a per-type extraction cap, and
a text-volume gate of roughly 500,000 tokens for anything indexed. See
Adding documents for the full table.
2b. Paste text
For a policy, a glossary or a chunk of a wiki that has no file:
- Click Add Text.
- Type a Document name — leave it blank and you get "Untitled Document".
- Paste into the content box.
- Click Add Document.
2c. Add one live source
A live source re-reads something on a schedule and keeps adding documents. Live sources need Pro or Max.
- Open the Live Data tab.
- Click Add source and choose Web page — "Track one URL and keep its content fresh." (Sitemap, RSS feed, YouTube and eight connected services are the other options.)
- Paste the URL and click Validate.
- Set Refresh schedule — Every hour, Every 6h, Every day or Every week — and leave the save mode on Save each item (recommended).
- Click Start auto-updates.
Cadence is approximate, not a clock: the dispatcher wakes every 15 minutes and takes up to eight due sources per pass, so "Every hour" means "within about 15 minutes of being due". Crawls consume credits, and a source that fails five times in a row disables itself.
Step 3 — Tell the AI how to read the material
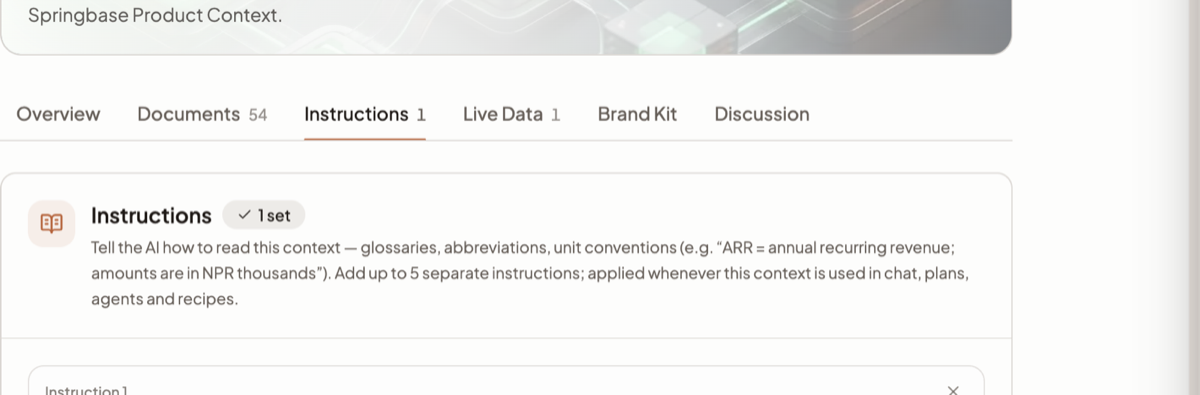
Open the Instructions tab. This is the reading guide that travels with the context into every chat, recipe and automated run that uses it — it is not a prompt you retype. See Instructions and Brand Kit.
- Click one of the starter chips, or add an instruction from scratch.
- Write one rule per instruction. The good ones name conventions your documents assume but never state: "ARR = annual recurring revenue", "all amounts are in USD thousands unless a sheet says otherwise", "treat blank cells in the revenue sheet as zero, not missing".
- Click Add another instruction (1/5) for the next one, up to five, then click Save.
Each instruction is capped at 2,000 characters — the counter under the box reads "135/2,000" —
and all five share a budget of about 1,500 tokens, counted out as 6,000 characters in the panel's
running total. Going over is refused on save with your current size named, rather than silently
trimmed. You can also Upload file to load a .txt or .md glossary straight into an instruction
instead of typing it.
Step 4 — Ask a question and check the citations
- Start a new chat.
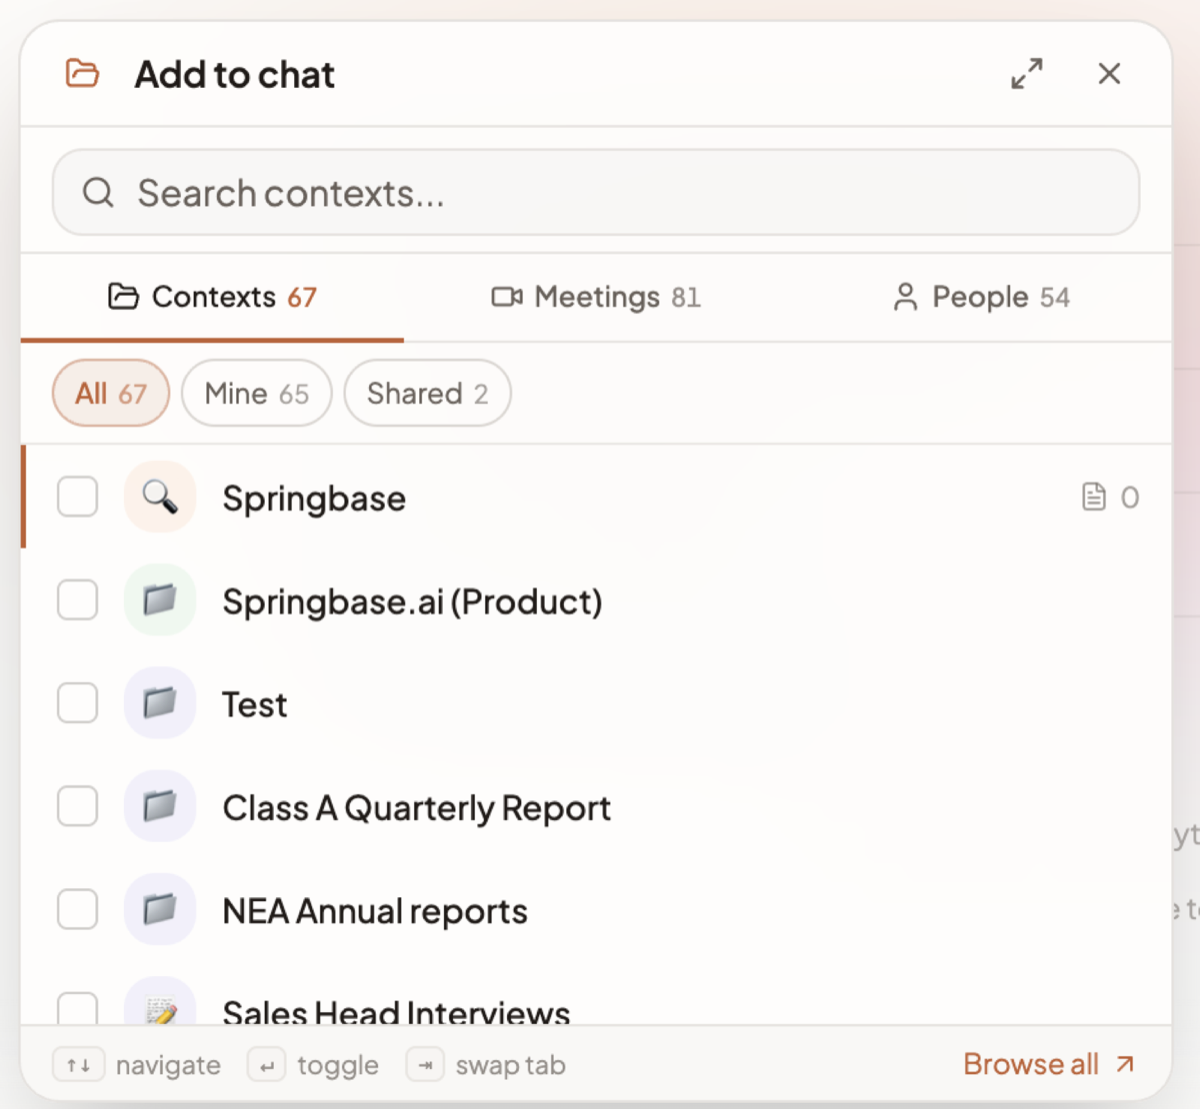
- Click Add context in the composer and pick your context — or type its
@handle. - Ask something only your material can answer. Use the words the documents use.
The answer carries numbered citations, and underneath it a collapsible Sources (n) list showing three by default. Click one and it deep-links to the exact document and passage. That round trip — question, citation, click, correct paragraph — is the real test that the context works.
Two honest caveats: attaching a context does not force retrieval, because a router still decides per question whether your documents are relevant; and when what it found is thin you get a low-confidence badge, "Retrieval confidence is low — the answer may not fully reflect your documents", rather than a confident wrong answer.
Step 5 — Share it with colleagues
Open the context and click Share in the hero — once published, that button reads its state instead (Unlisted, Organization, Team). The wizard runs Access → Presentation → Discovery; everything that matters is on the first step.
| Choice | What it means |
|---|---|
| Private | Only you, plus anyone you invite by email. A private context cannot be opened by link at all |
| Unlisted | "Anyone with the link can access." The link carries a token you can regenerate to cut off old copies |
| Organization / Team | Everyone in your enterprise, or one team. Only shown if your account is in one |
Then two settings that decide how much a recipient actually gets:
- Link Access — Can view, or Can edit. Can edit raises a confirmation, because link-holders "will be able to add, change, and delete its documents — not just read it."
- Source Access — Open ("Documents visible") or RAG-only ("Documents hidden"). This is the choice most teams get wrong. Open lets recipients read and download every source file. RAG-only lets them ask questions and get cited answers while the Documents tab stays shut, showing a note that the owner set the context to RAG-only. Pick RAG-only when the answers are for sharing but the underlying contracts, decks or exports are not.
RAG-only is not offered alongside Can edit — editors need to see what they are editing.
Save the access step, then copy the link. To bring in named people instead, click Manage sharing on the context's Overview tab: the Invite people dialog takes an email address and an Access level — Viewer, Viewer · chat only, Editor ("Can add, edit, and remove documents.") or Co-owner — and works even while the context stays Private. There is no Public tile for contexts — publishing to the public marketplace is not self-serve.
How to check it worked
- Every row on Documents shows the green Ready badge — not Processing, not Failed.
- The context chip in the composer has no amber spinner next to it.
- Your test question returns an answer with a Sources (n) list, and a citation click lands on the right paragraph.
- Open the unlisted link in a private browser window. On RAG-only you should be able to ask and get answers, and not be able to open a source document.
What commonly goes wrong
- You asked before indexing finished. The most common one by far. A document is not searchable until its badge turns Ready; while any are pending, the context chip in the composer shows an amber spinner reading "N documents still being indexed — not searchable yet", and the answer says so rather than guessing. Uploading 200 files and asking immediately gets you a shrug.
- A document failed. Failed rows give a plain-English reason plus Retry when it is worth retrying and Remove when it is not — usually a password-protected PDF, an over-limit file, an unreadable scan, or an unsupported format. Scanned pages go through OCR, which is metered.
- The same file twice. Identical bytes are rejected as a duplicate rather than indexed again.
- A live source stopped. It auto-disables after five consecutive errors, and a connected service whose sign-in expired shows an amber Reconnect.
- You shared it and nobody can open it. Visibility is probably still Private. Private is not a link, it is an invite list.
- A recipient can query but sees no files. That is RAG-only working as designed.
Where to go next
- Contexts — limits, tabs and the @handle in full
- Adding documents — every accepted type and every size ceiling
- Instructions and Brand Kit
- Live Data — all twelve source types
- Sharing a context — visibility, link roles and invitations
- From meeting to follow-ups — feed calls into the same context
Related docs
A Context is a named, reusable folder of knowledge you can pull into any chat with its @handle.
Every way to get content into a context, the file types that work, and the three size limits that compound.
Tell the AI how to read a context's documents, and define the palette, logos and voice that generated work inherits.
Four independent settings decide who can open a context, see its documents, edit it, and comment on it.